2024年11月21日星期四 下午8:22:51

浴室镜 卫浴镜

1 个月 前
#46630 引用
浴室防雾镜是一种特殊的镜子,在浴室中使用时不会起雾,通过对其需要展开分析,本设计基于51单片机设计的浴室防雾镜的系统架构如图2.1所示,采用了DS18B20温度传感器和人体红外感应红外传感器进行智能控制,通过两个温度传感器分别检测浴室环境温度和镜子的温度变化,HC-SR312人体红外感应红外传感器检测当前是否有人通过。系统会根据温度传感器实时监测浴室内部温度变化,一旦传感器检测到浴室温度升高,单片机启动热风扇以加热浴室镜面,从而防止镜子起雾。反之,如果浴室温度过低,单片机也可以根据传感器的信号控制制冷装置,以保持镜面温度适宜,确保镜面始终清晰可见。

                        
原文链接:https://blog.csdn.net/lvpeng7446281/article/details/141725611

https://blog.csdn.net/lvpeng7446281/article/details/141725611
0
1 个月 前
#46631 引用
结构设计
结构部分由镜面、镜面遮光板、镜面卡、灯罩、灯罩卡、机身、机身底、充电顶、充电底九部分组成


采购清单


1、通过DS18B20检测环境温度,通过另一个DS18B20检测镜子温度,当开启防雾模式时,自动加热或制冷浴室镜
2、通过光敏电阻检测光照强度
3、通过D203S人体热释电检测是否有人,如果有人,且光照较低,则自动打开氛围灯
4、通过SNR8016语音识别自动打开或关闭氛围灯或防雾模式
5、通过蓝牙远程控制打开或关闭氛围灯或防雾模式
6、通过按键手动打开或关闭氛围灯或防雾模式

https://www.mcuclub.cn/archives/37739


Hardware Used In This Tutorial


1  ×  ESP-WROOM-32 Dev Module  
1  ×  USB Cable Type-C  
1  ×  WS2812B RGB LED Strip  
1  ×  1000uF Capacitor  
1  ×  470Ω resistor  
1  ×  5V Power Adapter  
1  ×  (Optional) DC Power Jack  
1  ×  Jumper Wires  
1  ×  Breadboard  
1  ×  (Recommended) Screw Terminal Expansion Board for ESP32  
Or you can buy the following sensor kits:

1  ×  DIYables Sensor Kit (30 sensors/displays)  
1  ×  DIYables Sensor Kit (18 sensors/displays)  
0
1 个月 前
#46632 引用
现有:
 7段数码 4CM长*2cm宽*  厚
触摸按钮  2cm  圆形


diy采购清单
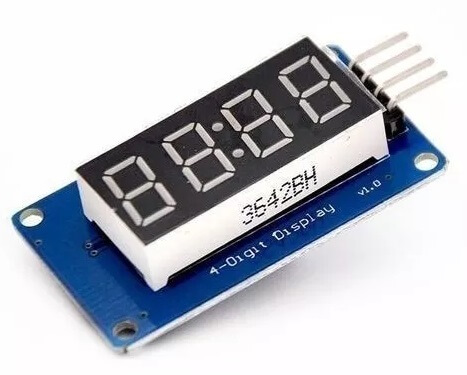
tm1637 白色显示 -TM1637 0.56寸四位七段数码管时钟显示模块  5.34元
https://detail.tmall.com/item.htm?_u=t1ed9uj2378&id=642186512431&spm=a1z09.2.0.0.16512e8dZop1G9&skuId=4625630813496

https://detail.tmall.com/item.htm?_u=t1ed9uj2378&id=642186512431&spm=a1z09.2.0.0.30372e8d3Yaa2o&skuId=4625630813496
44*24*12 mm
0
1 个月 前
#46635 引用
TM1637 7-Segment Display


https://esphome.io/components/display/tm1637

https://blog.csdn.net/qq_41830158/article/details/131668856
0
1 个月 前
#46636 引用
1
0
1 个月 前
#47676 引用

ESP32+ tm1637


Circuit Diagram


Connecting a TM1637 to an ESP32
Use jumper wires to make the following connections:

Connect the VCC pin of the TM1637 module to the 3.3V pin of the ESP32.
Connect the GND pin of the TM1637 module to the GND pin of the ESP32.
Connect the DIO pin of the TM1637 module to a GPIO pin of the ESP32 (e.g., GPIO 17).
Connect the CLK pin of the TM1637 module to another GPIO pin of the ESP32 (e.g., GPIO 16).


4脚7段数码管模块。VCC接5V电源,GND接地,CLK和DIO随便接两个GPIO就可以了。我使用的是ESP32 Devkit V1开发板,CLK接了D17,DIO接了D16。


# https://esphome.io/components/display/tm1637.html
ESP32 And TM1637 Code
test- run ok

display:
    platform: tm1637
    id: tm1637_display
    clk_pin: GPIO17
    dio_pin: GPIO16
    inverted: true
    length: 4
    lambda: |-
      it.print("0123");      
0
1 个月 前
#47677 引用
Digital clocks and timers - run ok

time:
  - platform: homeassistant
    id: homeassistant_time

display:
  platform: tm1637
  clk_pin: GPIO17
  dio_pin: GPIO16
  update_interval: 500ms
  lambda: |-
      static int i = 0;
      i++;
      if ((i % 2) == 0)
        it.strftime("%H.%M", id(homeassistant_time).now());
      else
        it.strftime("%H%M", id(homeassistant_time).now());    


source:https://esphome.io/components/display/tm1637.html
0
1 个月 前
#47678 引用
TM1637有20个引脚,上图里的模块引出了四个。此外,还有2个键扫输入信号、8个段选信号、6个位选信号。我们只需要直接操作引出的四个脚,其余的信号引脚连接着数码管或其它元件。
0
1 个月 前
#47679 引用
display:
  platform: tm1637
  clk_pin: GPIO17
  dio_pin: GPIO16
  update_interval: 500ms
  lambda: |-
      auto white = Color(255, 255, 255);
      static int i = 0;
      i++;
      if ((i % 2) == 0)
        it.strftime("%H.%M", id(homeassistant_time).now(),white);
      else
        it.strftime("%H%M", id(homeassistant_time).now());


run failure
0
1 个月 前
#47680 引用
1
0