2024年11月21日星期四 下午8:21:40

Installing Home Assistant Core 2022.3.0 on Raspberry Pi 3B+ step by step

2 年 前
#103 引用
Installing Home Assistant Core on Raspberry Pi 3B+

Raspberry Pi 3B+。和普通PC一样,拿到新设备第一件事就是要给它安装一个操作系统,并做一些初始化的操作。比PC简单的是,树莓派是一个固定配置的硬件板子,并没有像PC那样有很多硬件组合的情况,因此可以很方便的给它打造一个专用的系统。

Home Assistant Core+frontend

Home Assistant Core 也即 ha 的核,是核心部分,frontend 是 core 可以装载的一个零件。在组装任何零件之前,首先需要把 core 跑起来。

Prerequisites

需要先備有以下 6 個條件
– 運作載體(主機):Raspberry Pi ( 樹莓派),也可以用家中閒置電腦、NAS、Mac 來搭建,我選用 Raspberry Pi 的原因是耗電量低且運作較穩定。
– 記憶卡:準備 microSD,燒錄 Home Assistant 作業系統 Hass.io 的映像檔使用。
– 網路線(建議用網路線連接)
– 燒錄映像檔軟體:Etcher(下載走這)
-- 读卡器
-- HDMI 线
-- 键盘
-- Ethernet cable
-- A Windows 10 machine
-- 鼠标

Required hardware
A Raspberry Pi board
A micro-SD card
A good power supply
A monitor and display cable
A keyboard and mouse
Ethernet Cable


硬件推荐

SD卡-8G以上的SD卡(树莓派使用micro SD卡),最好是高速卡,推荐Class10以上的卡,因为卡的速度直接影响树莓派的运行速度.


Recommended
Raspberry Pi
Micro SD Card
Power Supply
Bluetooth Adapter (Option)
Ethernet Cable


PC ssh clent Software  on windows 10

xshell7
xftp7


Host Operating System: debian 11


Operating environment

Home Assistant Environment


hass --version
2022.3.0


Environment

Host system: Raspberry Pi  3b+
Installation methods: Python virtual environment + Home Assistant Core 2022.3
Running method: Running Home Assistant Core in a Python virtual environment
Firmware version: 26660700
deCONZ version: 2.07.01
Device: ConBee II
Do you use an USB extension cable: yes
Is there any other USB or serial devices connected to the host system? If so: Which? - NO


System Health

Version  core-2022.3.0
Installation Type  Home Assistant Core
Development  false
Supervisor  false
Docker  false
User  homeassistant
Virtual Environment  true
Python Version  3.9.2
Operating System Family  Linux
Operating System Version  4.19.66-v7+
CPU Architecture  armv7l
Timezone  UTC


0
2 年 前
#106 引用

Let’s Get Started


Connect your Raspberry Pi to the internet via the Ethernet port.
Internet connectivity is needed when the Hassbian SD card is first installed into your Raspberry Pi.

Internet connectivity is needed when the Hassbian SD card is first installed into your Raspberry Pi.
Insert the HASSbian SD card into the Raspberry Pi and connect it to power.

Login to the PI Through a Monitor/keyboard

Login in your Raspberry Pi as the default user – pi  password:raspberry


Change default  password for root login
unlock the root account


Enable ssh server on your Raspberry Pi


You will be asked to change it upon first login.

Get the IP address of your Raspberry Pi (For SSH users only)

There are a few options here :

Use your router's management interface

You can use a network discovery tool such as Angry IP Scanner (Win, Mac, Linux)

A portable (no install required) executable is provided for Windows users

Just scan your subnet for open ssh ports if you do not have a lot of devices supporting it (port 22)

Open a terminal on your Raspberry Pi (either local or via ssh from one of the above-mentioned options) :

For example, using Linux/WSL ssh terminal command :

ssh [email protected]  // IP address of your Raspberry Pi 4


Quick Start

The configuration is based on a Home Assistant Core installation.

Step 1:Hardware - 树莓派硬件连接


树莓派硬件连接 - 给树莓派连接上显示器、鼠标、键盘和网线。

https://www.msly.cn/boards/topic/57/installing-home-assistant-core-on-raspberry-pi-3b-step-by-step#140


Step 2:Login to the PI Through a Monitor/keyboard  for configure ssh

在本机上修改一些缺省被禁用的参数
首先,我们要在本机上修改一些缺省被禁用的参数,以便ssh client能登录到树莓派系统ssh server。

The default login is pi and the password is raspberry.

Step 3:Login to the PI Through a ssh client on windows 10


part 2:before Install

Update the Host  operating system
https://www.msly.cn/boards/topic/57/installing-home-assistant-core-202230-on-raspberry-pi-3b-step-by-step/page/3#18828


https://home-assisant.msly.cn/blog/home-assisant-connect-bluetooth-speaker-part-4/


安装方式选择-树莓派

Operating System: Raspbian GNU/Linux 9.4 (stretch)
Install Type: running Home Assistant Core in a Python virtual environment


在树莓派安装 Home Assistant,有 2 种方法供选择:

1. 以其他操作系统(这里以树莓派官方系统 Raspbian 为例)为根系统,再通过指令安装;

2. 直接安装集成了 Home Assistant 的 Hassbian 操作系统。


直接在树莓派的系统Raspbian上通过手动的方式安装Home Assistant

https://www.msly.cn/boards/topic/18/home-assistant-installation#54

first starting up

When first starting up, the Raspberry Pi will connect to the internet and start to download Home Assistant. This can take as long as 30 minutes depending on your internet speed.

While Home Assistant is downloading, open a new browser window on your computer.
0
2 年 前
#140 引用
树莓派第1次安装硬件连接+开通SSH server记录

树莓派硬件连接

SSH方法一(网线+路由器)

使用网线将树莓派与路由器连接
电脑连接同一个路由器(网线或者wifi)

HDMI,手动调整aoc 显示器设置连接方式:aoc 显示器设置连接方式由DP 调整为 HDMI 

调整树莓派显示分辨率
https://blog.csdn.net/weixin_36547245/article/details/86573228

接通显示器,网线,电源启动 Raspberry

建议有线连接,又稳定又不折腾。插电之后直接扔到角落,一年也就几十块电费。有时候无线连不上,没显示器还不好调试

Home Assistant Core – Installing on Raspberry

https://www.raspberryfield.life/2020/06/14/getting-started-with-home-assistant-core-installing/#BP043-ha-installing-core


https://zhuanlan.zhihu.com/p/578603455?


Prerequisites

A Linux based machine that has a debian 11 os


SSH client

You will also need an SSH client if you are connecting remotely to the Raspberry Pi or Build computer :
PuTTY
A good old Linux terminal (For Windows users, WSL can achieve this)


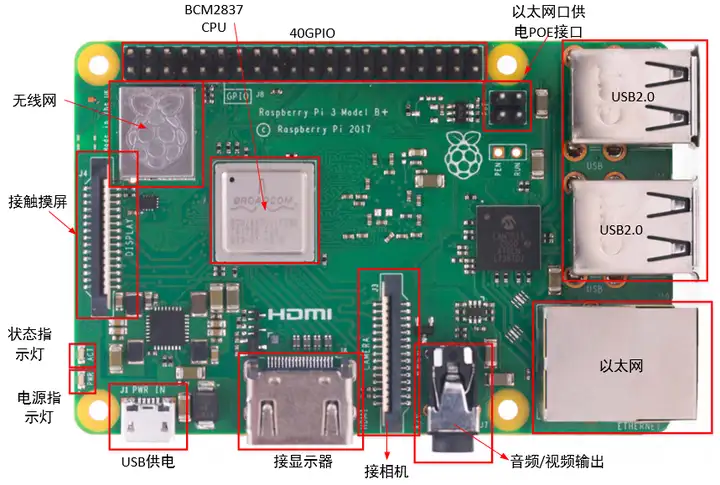
树莓派3B+模块图


树莓派3B+模块分部详解图


https://zhuanlan.zhihu.com/p/192752795

树莓派3B+是树莓派3代系列的最后一个版本;

处理器:博通(broadcom2837B0)基于ARMv8内核(cortex-A53)64位@1.4GHz;
0
2 年 前
#1203 引用

为了操作方便,我还配置了一个无线键盘鼠标套装和带HDMI的显示器。如果没有的话也可以使用VNC连接(树莓派里面要启动相应配置),或者linux命令熟悉的同学直接在自己电脑上putty远程连接也可以

查看树莓派操作系统版本  - 2022.03

root@raspberrypi:~# lsb_release -a
No LSB modules are available.
Distributor ID:  Raspbian
Description:  Raspbian GNU/Linux 9.4 (stretch)
Release:  9.4
Codename:  stretch


cat /etc/os-release

root@raspberrypi:~# cat /etc/os-release
PRETTY_NAME="Raspbian GNU/Linux 9 (stretch)"
NAME="Raspbian GNU/Linux"
VERSION_ID="9"
VERSION="9 (stretch)"
ID=raspbian
ID_LIKE=debian
HOME_URL="http://www.raspbian.org/"
SUPPORT_URL="http://www.raspbian.org/RaspbianForums"
BUG_REPORT_URL="http://www.raspbian.org/RaspbianBugs"


Kernel version: displays system information
uname -a
root@raspberrypi:~# uname -a
Linux raspberrypi 4.14.79-v7+ #1159 SMP Sun Nov 4 17:50:20 GMT 2018 armv7l GNU/Linux

it includes the host name, the kernel version, the release date and the architecture

# cat /etc/debian_version
9.13


查看当前系统所用内核
# uname -r
root@raspberrypi:~# uname -r
4.14.79-v7+


#cat /etc/rpi-issue

output - 20230702

Raspberry Pi reference 2018-11-13
Generated using pi-gen, https://github.com/RPi-Distro/pi-gen, 7e0c786c641ba15990b5662f092c106beed40c9f, stage5

0
2 年 前
#1204 引用
Step 1 – Configure SSH:

In November 2016, SSH was disabled by default on Raspbian.This move was made to prevent Raspberry Pi devices from potentially becoming a part of an IoT botnet.

To allow a SSH connection to your Raspberry Pi, just add an empty ssh file to the root directory of your SD-card. Just an empty file without a file extension.


Can't SSH into Raspberry Pi 3b+ from Windows 10

第1个要解决的问题:ssh server 默认未开启的问题

ssh login fails due to SSHserver  disabled  On RP default


p1:Raspberry Pi SSH permission denied


I am unable to ssh into my raspberry pi 3b+ from Windows 10.

My pi is at IP 192.168.1.69 and the windows machine is at 192.168.1.80. Running ssh -vvv [email protected] from windows results in the following:

debug1: read_passphrase: can't open /dev/tty: No such file or directory
[email protected]'s password:
debug3: send packet: type 50
debug2: we sent a password packet, wait for reply
debug3: receive packet: type 51
debug1: Authentications that can continue: publickey,password
Permission denied, please try again.
debug3: failed to open file:C:/dev/tty error:3
debug1: read_passphrase: can't open /dev/tty: No such file or directory


开启SSH


Pi 上运行 Raspbian 并已通过以太网或 WiFi 成功连接到网络。

SSH 在 Raspberry Pi 中默认处于禁用状态,因此您必须在全新安装 Raspbian 后打开 Pi 时启用它。

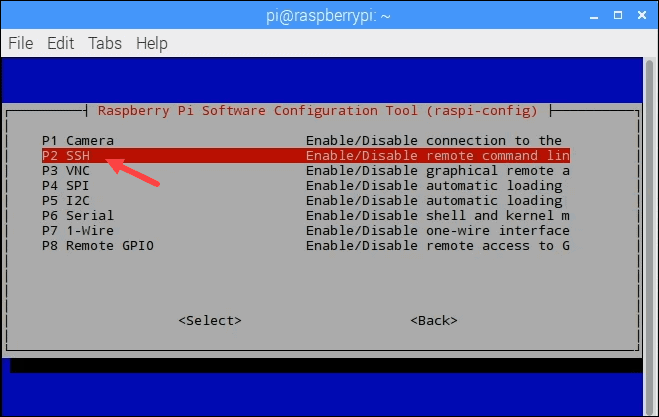
只需输入命令 sudo raspi-config 然后转到高级选项以启用 SSH。

or

在boot文件夹下新建一个空白的ssh文件即可,树莓派开机后会自动ssh服务。

raspi-config
Use the arrows on your keyboard to select Interfacing Options.


ssh localhost


远程登录树莓派,用于编辑配置文件可以安装Samba、WinSCP、VS-code或者直接用VNC远程登录。

一般是两种方法,一种是使用SSH协议的PUTTY,一种是VNC的VNC Viewer.

VNC具有图形界面,更受大家喜欢,你不需要给树莓派外置任何设备,就能在电脑上像运行一个普通程序一样,操作树莓派。 配置树莓派VNC1. 输入sudo raspi-config

VNC远程登录树莓派.


https://bbs.huaweicloud.com/blogs/detail/161163

0
2 年 前
#1205 引用
查看树莓派 | Linux 系统是多少位

Is my Raspberry Pi running a 64 or 32 bits OS?

root@raspberrypi:~# getconf LONG_BIT
32


如果结果返回 32,说明是 32 位系统;

如果结果返回 64,说明是 64 位系统

root@raspberrypi:~# uname -m
armv7l


If it’s ARMv3 to v7: You are running a 32 bits operating system
If it’s ARMv8 or aarch64: You are on a 64 bits operating system


If your CPU is a 64bit one (x86-64), you can use it with a 64 bit OS.

ARMv8指令集分为Aarch64和Aarch32指令集,而ARMv7使用的是A32和T16指令集(分别为32位和16位)。

raspberrypi OS Lite 64bit on p3b+

raspberrypi:/home/homeassistant20221103# uname -m
aarch64


@raspberrypi:/home/homeassistant20221103# getconf LONG_BIT
32
64


source:https://blog.csdn.net/u012505617/article/details/89205642
0
2 年 前
#1206 引用
connect to your Raspberry pi 3b+ with SSH.

Raspberry pi 3b+  SSH Access  from Windows 10

远程SSH连接树莓派

1.Raspberry pi 3b+  SSH Access Using xshell7 from Windows 10


2.

Opening a Terminal window

ssh pi@[ip address of your pi]


If you don't know the ip address and you're on the same network, you can use its host name. By default it is raspberrypi.


root@raspberrypi:~# sudo systemctl list-unit-files | grep enabled | grep ssh
ssh.service                            enabled  
sshswitch.service                      enabled


202309  updated
Xshell Xshell.exe: 7.0.0026

Xshell.exe: 7.0.0026

Xftp 7 Build 0137, Aug 17, 2023

0
2 年 前
#1207 引用
Raspberry local root Login

Enable Raspberry local root Login

开启root账号


Follow the steps below:

Login in your Raspberry Pi as the default user – pi  password:raspberry

Now,Change a new password for root login

type the command ‘sudo passwd root’
Enter the new password for the user ‘root’

Now, unlock the root account
Type the command ‘sudo passwd --unlock root’


#修改root密码
sudo passwd root
#解锁root用户
sudo passwd --unlock root


Raspberry Pi Default Login: Change Credentials
https://www.raspberrypistarterkits.com/guide/raspberry-pi-default-login-change/
0
2 年 前
#1208 引用
How to Find your Raspberry Pi  IP Address

Offcial Website DOC:https://www.raspberrypi.com/documentation/computers/remote-access.html#how-to-find-your-ip-address

1.树莓派连接显示屏,手动操作选择WiFi连接(或有线连接),连接成功后使用ip a命令查看自己的ip
2.无显示屏的情况下,自动连接到网络后,在路由器中查看新接入的设备,找到树莓派的ip
3.使用ip扫描工具,在设备接入网络之前扫描一次,接入网络之后扫描一次,做个对比,找到树莓派的ip


way 1:

If you don't know the ip address and you're on the same network, you can use its host name. By default it is raspberrypi

root@raspberrypi:~# ping raspberrypi.local
PING raspberrypi.local (192.168.101.50) 56(84) bytes of data.
64 bytes from 192.168.101.50: icmp_seq=1 ttl=64 time=0.142 ms
64 bytes from 192.168.101.50: icmp_seq=2 ttl=64 time=0.123 ms
64 bytes from 192.168.101.50: icmp_seq=3 ttl=64 time=0.090 ms
64 bytes from 192.168.101.50: icmp_seq=4 ttl=64 time=0.100 ms


way  2:
arp -a


Internet 地址         物理地址              类型
  192.168.101.1         14-3c-8a-19-e9-a6     动态
  192.168.101.11        58-fb-84-ea-8a-e0     动态
  192.168.101.22        44-8a-5b-8a-d0-ff     动态
  192.168.101.45        66-b9-a8-01-8a-9f     动态
  192.168.101.50        b8-27-eb-8a-3c-50     动态
  192.168.101.255       ff-ff-ff-ff-ff-ff     静态


way 3: ip a


2: ens33: <BROADCAST,MULTICAST,UP,LOWER_UP> mtu 1500 qdisc fq_codel state UP group default qlen 1000
    link/ether 00:0c: brd ff:ff:ff:ff:ff:ff
    altname enp2s1
    inet 192.168.2.3/24 brd 192.168.2.255 scope global dynamic noprefixroute ens33
       valid_lft 3710sec preferred_lft 3710sec


0
2 年 前
#1212 引用
The first thing you need to do is to get the latest version of Raspbian running on yourRaspberry 3b+

https://www.msly.cn/how-to-upgrade-raspberry-pi-os-to-the-latest-version-2022


Install Home Assistant Core on Raspberry Pi 3B+


This is run ok.

come from:https://www.home-assistant.io/installation/raspberrypi

Installation methods

Python virtual environment + Home Assistant Core

sudo apt-get install -y python3 python3-dev python3-venv python3-pip libffi-dev libssl-dev libjpeg-dev zlib1g-dev autoconf build-essential libopenjp2-7 libtiff5 libturbojpeg0-dev tzdata


sudo useradd -rm homeassistant -G dialout,gpio,i2c


sudo mkdir /srv/homeassistant
sudo chown homeassistant:homeassistant /srv/homeassistant


sudo -u homeassistant -H -s
cd /srv/homeassistant
python3.9 -m venv .
source bin/activate


ohter

python3.9 -m venv .


homeassistant20230200@raspberrypi:/srv/homeassistant20230200 $ ls -l
总用量 16
drwxr-xr-x 2 homeassistant20230200 homeassistant20230200 4096  2月  3 21:43 bin
drwxr-xr-x 2 homeassistant20230200 homeassistant20230200 4096  2月  3 21:42 include
drwxr-xr-x 3 homeassistant20230200 homeassistant20230200 4096  2月  3 21:42 lib
-rw-r--r-- 1 homeassistant20230200 homeassistant20230200   76  2月  3 21:42 pyvenv.cfg


python3 -m pip install wheel

pip3 install homeassistant


output
Downloading https://www.piwheels.org/simple/homeassistant/homeassistant-2022.3.0-py3-none-any.whl


del useradd  in debian

root@raspberrypi:~# sudo userdel --remove homeassistant20230202


root@raspberrypi:/home/homeassistant20230900# ls -ap | grep -v / | egrep "^\."
.bash_logout
.bashrc
.profile
root@raspberrypi:/home/homeassistant20230900# ls -ap | grep -v / | egrep "^\."
.bash_logout
.bashrc
.profile


0